
How We Built Our Own Rain Garden as a Complete Beginner
Building a rain garden was one of those projects we’d heard about but never fully understood until we decided to dive in ourselves. Now, in our 40s, we’re all about making our garden as sustainable as possible—whether that means saving water, helping the environment, or just creating a space we love. And after several downpours flooded our yard, we realized it was time to take action!
Why We Chose to Build a Rain Garden
The Importance of Managing Rainwater Runoff
In the past, we’d watched as heavy rains turned our yard into a swamp, and we knew something had to change. After reading up on rain gardens, we realized this could be a fun and eco-friendly solution. Not only would it help reduce runoff and flooding, but it would also give us a chance to improve our garden’s biodiversity by providing a sanctuary for wildlife.
What is a Rain Garden?
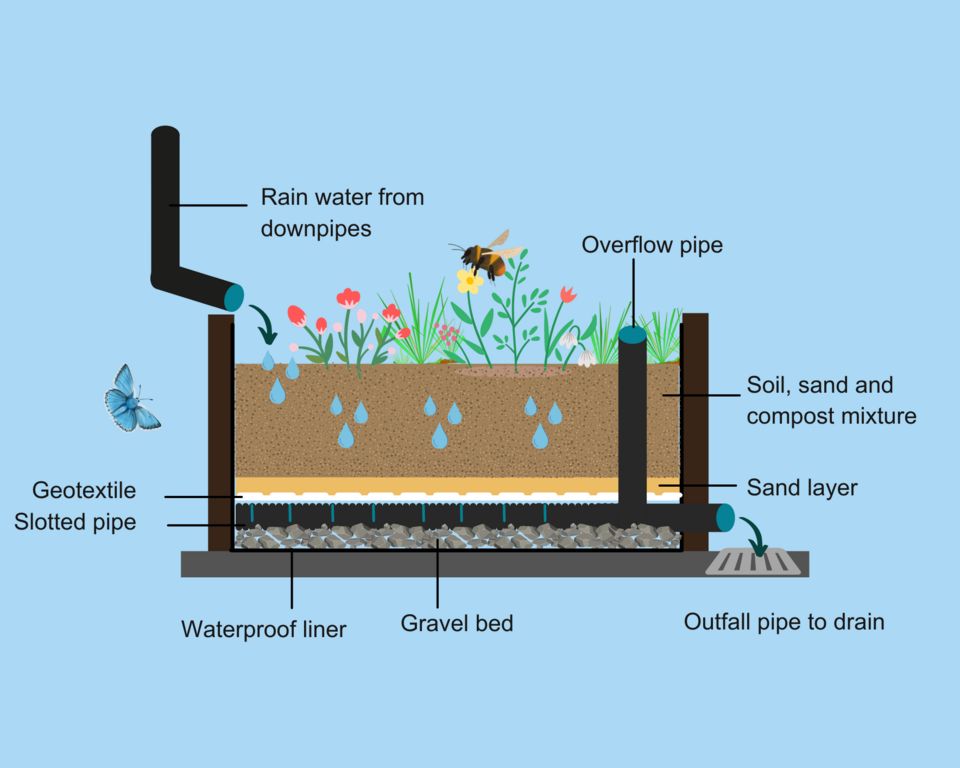
For those of you who might be new to the concept, a rain garden is essentially a shallow depression in the ground that collects and filters rainwater runoff from hard surfaces like your roof or driveway. The water slowly soaks into the soil, reducing flooding and improving drainage in your yard. But it’s not just about functionality—it’s also a way to create a beautiful and thriving space filled with plants that attract pollinators, birds, and more.
How We Designed Our Perfect Rain Garden
Choosing the Right Location
The first step was choosing the location. We knew our garden had to be on a slight slope (nothing too steep), and we made sure to steer clear of any tree roots. After a bit of back-and-forth, we decided on a spot that received a lot of runoff and was in partial sun. This turned out to be ideal because the garden would get plenty of water without being too shady.
We also made sure it was far enough from the house (at least 5 meters) to avoid any issues with foundation damage. Pro tip: It’s always a good idea to check for underground utilities before you start digging!

Preparing the Site
Once we found the perfect spot, we got to work. We used a garden hose to outline the shape of the rain garden—think kidney-shaped for a natural look. Digging was the most strenuous part, but once we removed the existing grass and soil, we had our shallow depression. To keep the water from spilling over, we built a berm (a raised edge) around the garden. This was key to containing the water and preventing it from flooding the surrounding areas.
Adding Organic Matter for Healthy Soil
Before planting, we mixed in some organic matter to improve the soil structure. We used leaf mold, compost, and well-rotted manure to create the perfect environment for our plants. It was a bit of work, but it would pay off in the long run with healthy, thriving plants.
Choosing Plants for Our Rain Garden
What Plants Work Best in a Rain Garden?
Now for the fun part—picking the plants! We chose a mix of perennials, grasses, and shrubs that could handle both wet conditions and occasional droughts. The key was selecting plants that would tolerate short periods of waterlogging but also thrive when the garden dried out. Some of our favorite picks were:
-
- Yellow Flag Iris (Iris pseudocorus) – A beautiful and tough plant for wet conditions.
-
- Daylily (Hemerocallis) – Hardy and vibrant, these flowers add color and texture.
-
- Coneflower (Echinacea purpurea) – Perfect for attracting pollinators like bees and butterflies.
-
- Meadowsweet (Filipendula ulmaria) – A native plant that thrives in damp spots.
-
- Purple Loosestrife (Lythrum salicaria) – Adds vertical interest and blooms in late summer.
We also threw in some grasses like Miscanthus and Deschampsia for added texture and winter interest.
Planting for Maximum Visual Appeal
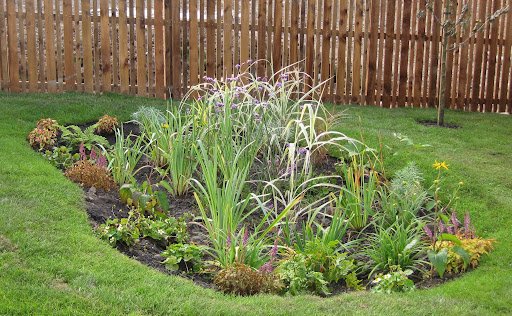
Planting was another important step. We arranged the plants in groups for a natural look, placing the more moisture-loving plants closer to the center and the drought-tolerant ones along the edges. The goal was to create a garden that was both functional and beautiful—a garden that would look great all year round and attract a variety of wildlife.

The First Summer with Our Rain Garden
Watching Our Rain Garden Work
The real test came after the first big storm. We stood at the window, watching as the rain poured down and filled the garden. For the first time, we didn’t have to worry about flooding or runoff! The rain garden absorbed the water beautifully, and within a few hours, it had drained away, leaving the plants healthy and happy. It was so satisfying to watch our rain garden do its thing!
Attracting Wildlife
As the weeks passed, we noticed the garden becoming more and more alive. Bees buzzed around the flowers, butterflies fluttered by, and even birds began to visit. We were thrilled to see so much wildlife thriving in our little rain garden. It felt amazing knowing that our efforts weren’t just about creating a nice garden for us—they were also helping the environment.
Tips for Building Your Own Rain Garden
Choose the Right Location
Make sure your rain garden is in an area that drains well but isn’t too close to your home’s foundation. A gentle slope (less than 10%) works best, and don’t forget to check for underground utilities!
Design for Function and Beauty
Think about how you want your garden to look as well as how it will function. A kidney-shaped design is popular, but you can get creative with the layout. Just remember to plant wetter-tolerant species in the center and more drought-tolerant ones along the edges.
Select the Right Plants
When picking plants, choose native species that are suited to your region’s rainfall and drainage conditions. Some of the best plants for rain gardens include Yellow Flag Iris, Daylilies, and Coneflowers. These will not only survive the wet conditions but will also attract beneficial pollinators.
Incorporate Organic Matter
Make sure to add organic matter like compost and leaf mold to the soil. This will improve drainage and ensure your plants have the nutrients they need to thrive.
Test the Drainage
Before you plant, test your soil’s drainage by digging a hole and filling it with water. If the water drains within a few hours, your site is ideal for a rain garden!
The Bottom Line: Is a Rain Garden Worth It?
Absolutely! Building a rain garden is a project that requires some work, but it’s totally worth the effort. Not only does it help manage stormwater and reduce flooding, but it also creates a stunning, low-maintenance garden that supports local wildlife. Plus, once the garden is established, it practically takes care of itself—no more soggy lawn or high water bills.
So, if you’re looking for an eco-friendly way to beautify your garden and help the environment, a rain garden is the perfect solution. Get creative, have fun with it, and enjoy the many benefits it brings!
Key Takeaways:
-
- A rain garden is a beautiful, sustainable way to manage rainwater runoff and reduce flooding.
-
- Proper planning, plant selection, and soil preparation are key to creating a successful rain garden.
-
- Not only will you reduce runoff, but you’ll also attract a wide range of wildlife to your garden.
With the right planning and care, you can enjoy your own rain garden for years to come—rain or shine!
A full guide can be found at https://www.rhs.org.uk/garden-features/rain-gardens
For Handmade Garden Planters visit Garden Troughs & Planters (Affiliate Link)
Read more of our Blog Posts Here
